Tuesday, September 30, 2014
Monday, September 29, 2014
Grilled Peameal Bacon
Grilled Peameal Bacon
Ingredients:
1/4 cup maple syrup
2 tablespoons Dijon mustard
Pinch pepper
1 pound peameal baco
Preparation:
In small bowl, combine maple syrup, Dijon mustard and pepper; set half aside for serving.
Cut bacon into 8 generous 1/4 inch thick slices. Brush 1 side of each with half of the remaining mustard mixture.
In
batches, place bacon slices, mustard-side down, on greased nonstick
grill pan or in skillet over medium-high heat. Brush slices with
remaining mustard mixture; grill for about 5 minutes or until bottom is
browned.
Turn and grill for about 3 minutes or until browned. Serve with reserved mustard mixture

Cheddar Baked Chicken
Cheddar Baked Chicken
- 1/4 cup butter, melted
- 1/2 cup AP flour
- 1 tsp salt
- 1 tsp pepper
- 1 tsp garlic powder
- 1 egg
- 1 tbsp milk
- 1 cup shredded mild cheddar cheese
- 1 pouch Shake n Bake Extra Crispy
- 1 cup Rice Krispies
- 2-3 boneless, skinless chicken breasts, cut in half
- Preheat the oven to 350 degrees F. Pour your melted butter to coat the baking dish.
- Mix the flour, salt, pepper, and garlic powder in a bowl.
- In another bowl, whisk together the egg and milk.
- In a third bowl, combine the cheese, bread crumbs, and cereal.
- Keep your bowls in that order and work down the line. First, dredge your chicken in the flour mixture, dip in the eggs, then press it in the bread crumb mixture to coat. Really push the chicken down in the bread crumbs. Transfer to your baking dish.
- Bake for 35 minutes or until coating is golden brown and chicken is done. (35 minutes was just a tidge too long in my oven, so keep an eye on it)


Oreo Fudge Brownies
Oreo Fudge Brownies
Chocolate gooey goodness! Wow, these look amazing. I have a soft spot for brownies, but now I think I’m in love. It’s all of my favorites mixed into a big pile of heaven. Please go visit Keven & Amanda for this yummy brownie recipe! And, if you like this one, they have a ton of other delicious dessert recipes, too–gooey s’mores cookies, caramel toffee latte cupcakes, caramel apple macaroons. Yep, some good stuff

Sunday, September 28, 2014
List of 100 things to draw
100 Things to draw are...........
11.Other people’s spouses (careful with this one!) 12.Your parents
13.Your relatives
14.Your kids
15.Other people’s kids
16.Your bed
17.Other people’s bed (careful with this one as well) 18.The people who pass you on the street
19.A chair
20.A table
-
Your cat
-
Your dog
-
Other people’s cat
-
Other people’s dogs
-
Cars
-
Bicycles
-
Motorbikes
-
Your body (or other’s -- it’s a wonderland after all!)
-
Your husband
11.Other people’s spouses (careful with this one!) 12.Your parents
13.Your relatives
14.Your kids
15.Other people’s kids
16.Your bed
17.Other people’s bed (careful with this one as well) 18.The people who pass you on the street
19.A chair
20.A table
21. Lamps
22.Your cup
23.Your plate
24.Your cutlery
25.The drapes
26.That hanging fan that creaks a lot
27.Book covers
28.Food (this alone is a lot to play with) 29.Desserts (totally different category altogether) 30.What you’re wearing today
31.What you wore some other day
32.A commentary on politics
33.A joke you heard
34.A quote you love
35.That new favorite pair of shoes you just bought 36.Your hands
37.Other people’s hands
38.Or feet
39.Your favorite pencil
40.Manly tools (not THOSE. Think spanners )
41.Your favorite place
42.Bathroom fixtures
43.Your bathroom lotions and potions 44.Kitchen appliances
45.Pots and pans
46.Insects (butterflies, toads, spiders) 47. Birds
48. Flowers
49.Trees
50.Shrubs
51.Grass
52.Your purse
53.Other people’s purses (careful...) 54.Boxes
55.Animals that are imaginary 56.Animals that are real
57.Mosters
58.The inside of your house
59.Your favorite buildings
60.Your favorite people
61.Things you’d like to see 62.People you haven’t met yet 63.Your dreams
64.What you’d like for Christmas 65.What you want RIGHT NOW
66. Hair
67. Hats
68. Dresses
69.Shirts
70.Pants
71.Underwear
72.Socks
73.Glasses
74.Shop displays
75.Clowns
76.The circus (or a theme park) 77.Baskets
78.A new invention
79.Your thoughts
80.Your business plan (yes, draw it!)
imagine. ////////////////
81. Things that go bump in the night 82. Things that smell
83. Things that fly
84. Things that make you go hmmmm 85. Things that remind you of love
86. Things that make you sleep
87. Things that keep you awake
88. Things that start with the letter A (or B, C, D...) 89. Things that can only go up, not down
90. Things that will last forever
what if... ? //////////
91. ... You cross an armadilllo with a rat? (or any combinations of animals really)
92. ... Flowers are geometrical instead of organic? 93. ... You can only hear instead of see? How will
your work turn out then? 94. ... You dream in stills?
95. ... You can fly? What will you see?
96. ... Gravity was turned on its head?
97. ... What if you took a different path in life?
How would you see things?
98. ... What if you woke up one day with no recol-
lection of the previous day?
99. ... What if everything was made out of jello? 100. ..What if you could see into the future? What
41.Your favorite place
42.Bathroom fixtures
43.Your bathroom lotions and potions 44.Kitchen appliances
45.Pots and pans
46.Insects (butterflies, toads, spiders) 47. Birds
48. Flowers
49.Trees
50.Shrubs
51.Grass
52.Your purse
53.Other people’s purses (careful...) 54.Boxes
55.Animals that are imaginary 56.Animals that are real
57.Mosters
58.The inside of your house
59.Your favorite buildings
60.Your favorite people
61.Things you’d like to see 62.People you haven’t met yet 63.Your dreams
64.What you’d like for Christmas 65.What you want RIGHT NOW
66. Hair
67. Hats
68. Dresses
69.Shirts
70.Pants
71.Underwear
72.Socks
73.Glasses
74.Shop displays
75.Clowns
76.The circus (or a theme park) 77.Baskets
78.A new invention
79.Your thoughts
80.Your business plan (yes, draw it!)
42.Bathroom fixtures
43.Your bathroom lotions and potions 44.Kitchen appliances
45.Pots and pans
46.Insects (butterflies, toads, spiders) 47. Birds
48. Flowers
49.Trees
50.Shrubs
51.Grass
52.Your purse
53.Other people’s purses (careful...) 54.Boxes
55.Animals that are imaginary 56.Animals that are real
57.Mosters
58.The inside of your house
59.Your favorite buildings
60.Your favorite people
61.Things you’d like to see 62.People you haven’t met yet 63.Your dreams
64.What you’d like for Christmas 65.What you want RIGHT NOW
66. Hair
67. Hats
68. Dresses
69.Shirts
70.Pants
71.Underwear
72.Socks
73.Glasses
74.Shop displays
75.Clowns
76.The circus (or a theme park) 77.Baskets
78.A new invention
79.Your thoughts
80.Your business plan (yes, draw it!)
do you see?
Thursday, September 25, 2014
Pumpkin Sugar Cookies with Cinnamon Cream Cheese Frosting
Pumpkin Sugar Cookies with Cinnamon Cream Cheese Frosting

Ingredients
- 3 cups all-purpose flour
- 2 tsp cornstarch
- 1 tsp baking powder
- 1/2 tsp baking soda
- 1/2 tsp salt
- 1/2 tsp ground cinnamon
- 1/4 tsp ground nutmeg
- 1/4 tsp ground ginger
- 1/2 cup unsalted butter, softened
- 1/3 cup unflavored vegetable shortening
- 1 1/4 cups granulated sugar
- 2 large egg yolks
- 2/3 cup canned pumpkin puree
- 1 tsp vanilla extract
- 3 oz cream cheese, softened
- 3 Tbsp butter, softened
- 3/4 tsp ground cinnamon
- 1/2 tsp vanilla extract
- 2 1/2 cups powdered sugar
- 1 - 1 1/2 Tbsp milk
Frosting
Directions
- For the cookies:
- Preheat oven to 350 degrees. In a mixing bowl whisk together flour, cornstarch, baking powder, baking soda, salt, cinnamon, nutmeg, and ginger for 20 seconds, set aside.
- In the bowl of an electric stand mixer fitted with the paddle attachment, cream together butter, shortening and sugar until pale and fluffy. Mix in egg yolks one at a time. Mix in pumpkin puree and vanilla extract. With mixer set on low speed, slowly add in dry ingredients and mix until combined.
- Scoop dough out and shape into 3 Tbsp balls (I just filled 1/4 cup 3/4 full). Place on Silpat or parchment paper lined baking sheets (you'll only be able to fit about 8 per sheet, these are fairly large cookies), and using your fingers lying flat, evenly flatten cookies into rounds until they are slightly under 1/2-inch thick. Bake in preheated oven 11 - 12 minutes. Cool on baking sheet several minutes then transfer to a wire rack to cool completely. Once cool frost with Cinnamon Cream Cheese Frosting. Store in an airtight container.
- For the frosting:
- In the bowl of an electric stand mixer fitted with the paddle attachment, whip together cream cheese and butter until pale and fluffy. Mix in cinnamon, vanilla extract and powdered sugar. Mix in enough milk to reach desired consistency and mix until smooth and slightly fluffy.
- Recipe Source: Cooking Classy


Olaf Sock Snowman
Olaf Sock Snowman
Do you want to build a snowman?Want to learn how to make your own "Happy Snowman?"

RELATED: 40+ Crafts to Make with Your Kids, Marshmallow Snowman Tutorial
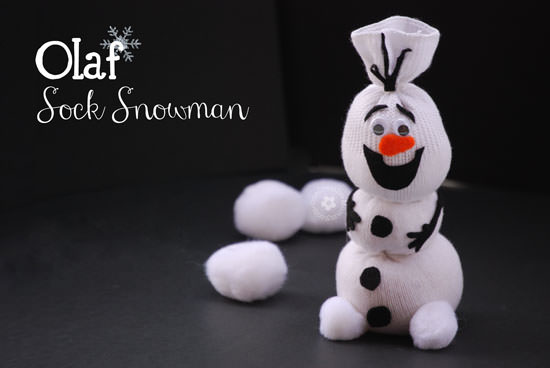
Olaf Sock Snowman Tutorial
You can adapt this tutorial for any size sock, but my measurements and printable are sized for Bobby Socks, kids size small, fits shoe sizes 5 1/2 to 8 1/2. You can use anything from a toddler sock to an adult sock, but I liked this size the best.Materials Needed for each Snowman:

- 1 bobby sock
- Approximately 1 1/3 cups of rice -- any kind
- 2 1-inch white pom poms
- Orange felt -- just a small piece
- Large googly eyes
- Adhesive-backed black felt--one sheet of sticky-backed felt is enough for 12 snowmen.
- 3 clear hair elastics. (I used goody brand, medium size. They come in tiny, medium and large sizes.)
- Hot glue gun and glue
- Free Olaf Features Printable. Click download link below to get the download.

Helms Christmas Tree Decoration
Helms Christmas Tree Decoration
Why not try making this
Christmas tree using helms weave? By using different combinations of
rings, you can make a tree decoration or a smaller pair of earrings.

You will need:
- 30 x green anodised aluminium machine cut jump rings, id 6.7mm, 1.29mm (A)
- 10 x shiny gold anodised aluminium saw cut jump rings, id 6.7mm, 1.29mm (B)
- 20 x mixed colour anodised aluminium saw cut jump rings, id 4mm, 1.29mm (C)
- 26 x green anodised aluminium saw cut jump rings, id 4.2mm, 0.81mm (D)
- 5 x brown anodised aluminium machine cut jump rings, id 6.7mm, 1.29mm (E)
- 2 x brown anodised aluminium saw cut jump rings, id 4.2mm, 1.29mm (F)
- two pairs of smooth faced chain nose, bent nose or flat nose pliers
| 1. Close all the green rings (A) and brown rings (E). Link one ring (C) to two green rings (A) – this ring (C) is the starter ring. | |
| 2. Link one ring (C) to two more green rings (A) and the green rings added in the previous step. Add a second ring (C). |
 |
| 3. Weave one gold ring (B) between the first pair of green rings so that you encircle the two rings (C) as in Fig. 1. Fold back the top green ring (A), which is attached on only one side. Close the gold ring (B). Return the folded back ring over the new gold inner ring. |
 |
| 4. Link one ring (C) to two more green rings (A) and the last two green rings added. Add a second ring (C). |
 |
| 5. Repeat steps 3 and 4 twice, adding pairs of rings (C). This is the first row. |
 |
It should look like this: |
 |
| 6. To make the second row, repeat steps 1 to 5 using three pairs of rings (C). |
 |
| 7. To make the third row, repeat steps 1 to 5 using two pairs of rings (C). |
 |
| 8. To make the fourth row, repeat steps 1 to 5 using one pair of rings (C). |
 |
| 9. Repeat steps 1 to 5, using only brown rings (E and F) to make the trunk. |
 |
| 10. Remove the starter rings from each row of rings. Referring to Fig 2, link the first and second rows using green rings (D). |
 |
| 11. Referring to the main picture, link the third and fourth rows to the first two rows as in step 10. |
 |
| 12. Link one pair of rings (A) at the top of your tree with two rings (D). |
 |
| 13. Add two hanging rings (D) to this last pair of rings. |
 |
| 14. Referring to the main picture, link the trunk to the base of your tree using green rings (D). |
 |
Decorating With Unusual Pumpkins For Halloween
Decorating With Unusual Pumpkins For Halloween
It's common to decorate for autumn and Halloween with pumpkins and Jack O' Lanterns,
but how about doing something a little bit different this year?
Take a look at these unique and creative pumpkin decorations and maybe you'll be
Take a look at these unique and creative pumpkin decorations and maybe you'll be
inspired to try something new too!


Create a beautiful pumpkin planter. By Circa Dee

I love the unique look of this black painted Jack O' Lantern.
I love the unique look of this black painted Jack O' Lantern.

Scarecrow Bars
Ingredients:
Directions:
- 1 box Yellow Cake Mix
- 1/2 cup softened Butter
- 2 Eggs
- 3 cup Mini Marshmallows
- 1/2 cup Corn Syrup
- 1/4 cup Sugar
- 1/4 cup Brown Sugar
- 1/2 cup Creamy Peanut Butter
- 1 tsp Vanilla
- 2 cup Crisp Rice Cereal
- 2 cup Salted Peanuts
- 1 cup Candy Corn
Directions:
- Preheat oven to 350.
- Beat cake mix and butter until combined.
- Add egg and beat until well mixed.
- Press into the bottom of ungreased 13×9 baking pan.
- Bake until it sets and the edges are lightly browned (about 15 minutes).
- Remove from oven and immediately sprinkle marshmallows over hot crust.
- Bake another couple of minutes until marshmallows puff up.
- Remove from oven.
- Combine corn syrup, sugar and brown sugar in saucepan.
- Bring to a boil over medium heat stirring constantly.
- Remove from heat.
- Add in peanut butter and vanilla and stir until smooth.
- Stir in cereal and peanuts.
- Spoon over marshmallow topped base and spread to cover.
- Sprinkle candy corn over mixture evenly and grently press in.
- Cool and cut into bars.


Ghost Meringues

To get started, you will need an electric mixer. I have a Kitchen Aid stand mixer and it works perfectly. But, any handheld mixer will work too! You’ll also need a baking sheet, some non-stick spray, and foil. To create the fun ghost meringue shape, you will also need icing bags and large round icing tips (sometimes found at your local craft store). Oh, and if you have kids around, get them involved!
ingredients
- 4 Egg Whites
- 1/2 tsp of Cream of Tartar
- 1 cup of Sugar
- Black Decorating Icing Gel
instructions
- Preheat oven to 225 degrees.
- Using an electric mixer, whip the egg whites for a few minutes on high speed until they become frothy (you will see lots of little bubbles).
- Next, add your sugar in small amounts.
- Finally, mix in the cream of tartar.
- Continue to whip the mixture until it gets stiff (meaning that it holds a shape when stopped).
- Prepare your baking sheet with a layer of foil covered with non-stick spray.
- Place the meringue mixture into an icing bag.
- Using your icing bag and a large round icing tip, continually press the meringue mixture directly down onto the foil. Press down and lift up to create layered stacks for each ghost (release the pressure just a tiny bit, pulling up on your frosting bag at the same time in between each layer).
- Bake them for about 45 minutes or until the tops become a little brown.
- Once they are completely cooled, they will harden and be ready to decorate with black gel frosting!
- Add eyes and mouths to your ghost (or create silly faces!).
- Store in an air tight container.


September 25,2014 11:43 .a.m.

How to Make Owl S’mores
Ingredients:
- graham crackers
- marshmallows
- chocolate chips
- yellow candy melts
- candy corn


- Cut one marshmallow in half and place both pieces on a large
graham cracker (2 stuck together). - Put a candy melt on top of the marshmallows.
- Heat in the microwave for about 2-5 seconds, just enough to make the marshmallows puff up, but not get too hot. (Time depends on your microwave – make sure to do a few test runs.)
- Take out of microwave and add a chocolate chip on the yellow candy melt and the candy corn beak while the marshmallows and candy are still warm. Everything should stick together nicely.
- Let cool and serve! You can make these the night before a party and everything is still very tasty.
Prep time: 10 minutes
September 25,2014 11:37 .a.m.

when drawing a feather use this as your guide.

eyes

nose

lips.

hair & head shape.
You can use this as your gude for drawing.
Subscribe to:
Comments (Atom)